

On this page
A Google button on the sign-in page. People use the account they already have, you stop managing passwords, and leavers lose access when their Google account is disabled rather than when somebody remembers to lock them here. New accounts can be created automatically for the email domains you name.
Creating the credentials on Google's side is covered in the Google Sign-In integration guide.
On RedminePRO Cloud
Availability
Plus and above.
Turn it on
Administration → Plugins → RedminePRO Google Sign-In, then paste the
Client ID and Client secret from your Google credentials. The button appears
on the sign-in page as soon as both are stored.
Permissions
None of its own. This decides how people prove who they are; what they may do afterwards is governed by their roles exactly as before.
Settings
Administration → Plugins → RedminePRO Google Sign-In:
| Setting | Default | Effect |
|---|---|---|
Client ID |
Blank | From your Google credentials |
Client secret |
Blank | Stored encrypted; enter a new value to replace it, leave blank to keep |
Authorized redirect URI |
Shown, not edited | Copy this exact value into Google |
Allowed email domains |
Blank | Comma-separated. Blank means no accounts are created automatically — only people who already have one may sign in |
Auto-link by verified email |
On | On first sign-in, attach to an existing active account whose verified email matches |
Default groups for new users |
None | Groups an automatically created account joins |
Force Google sign-in (SSO-only) |
Off | Hides the password form and refuses password sign-in |
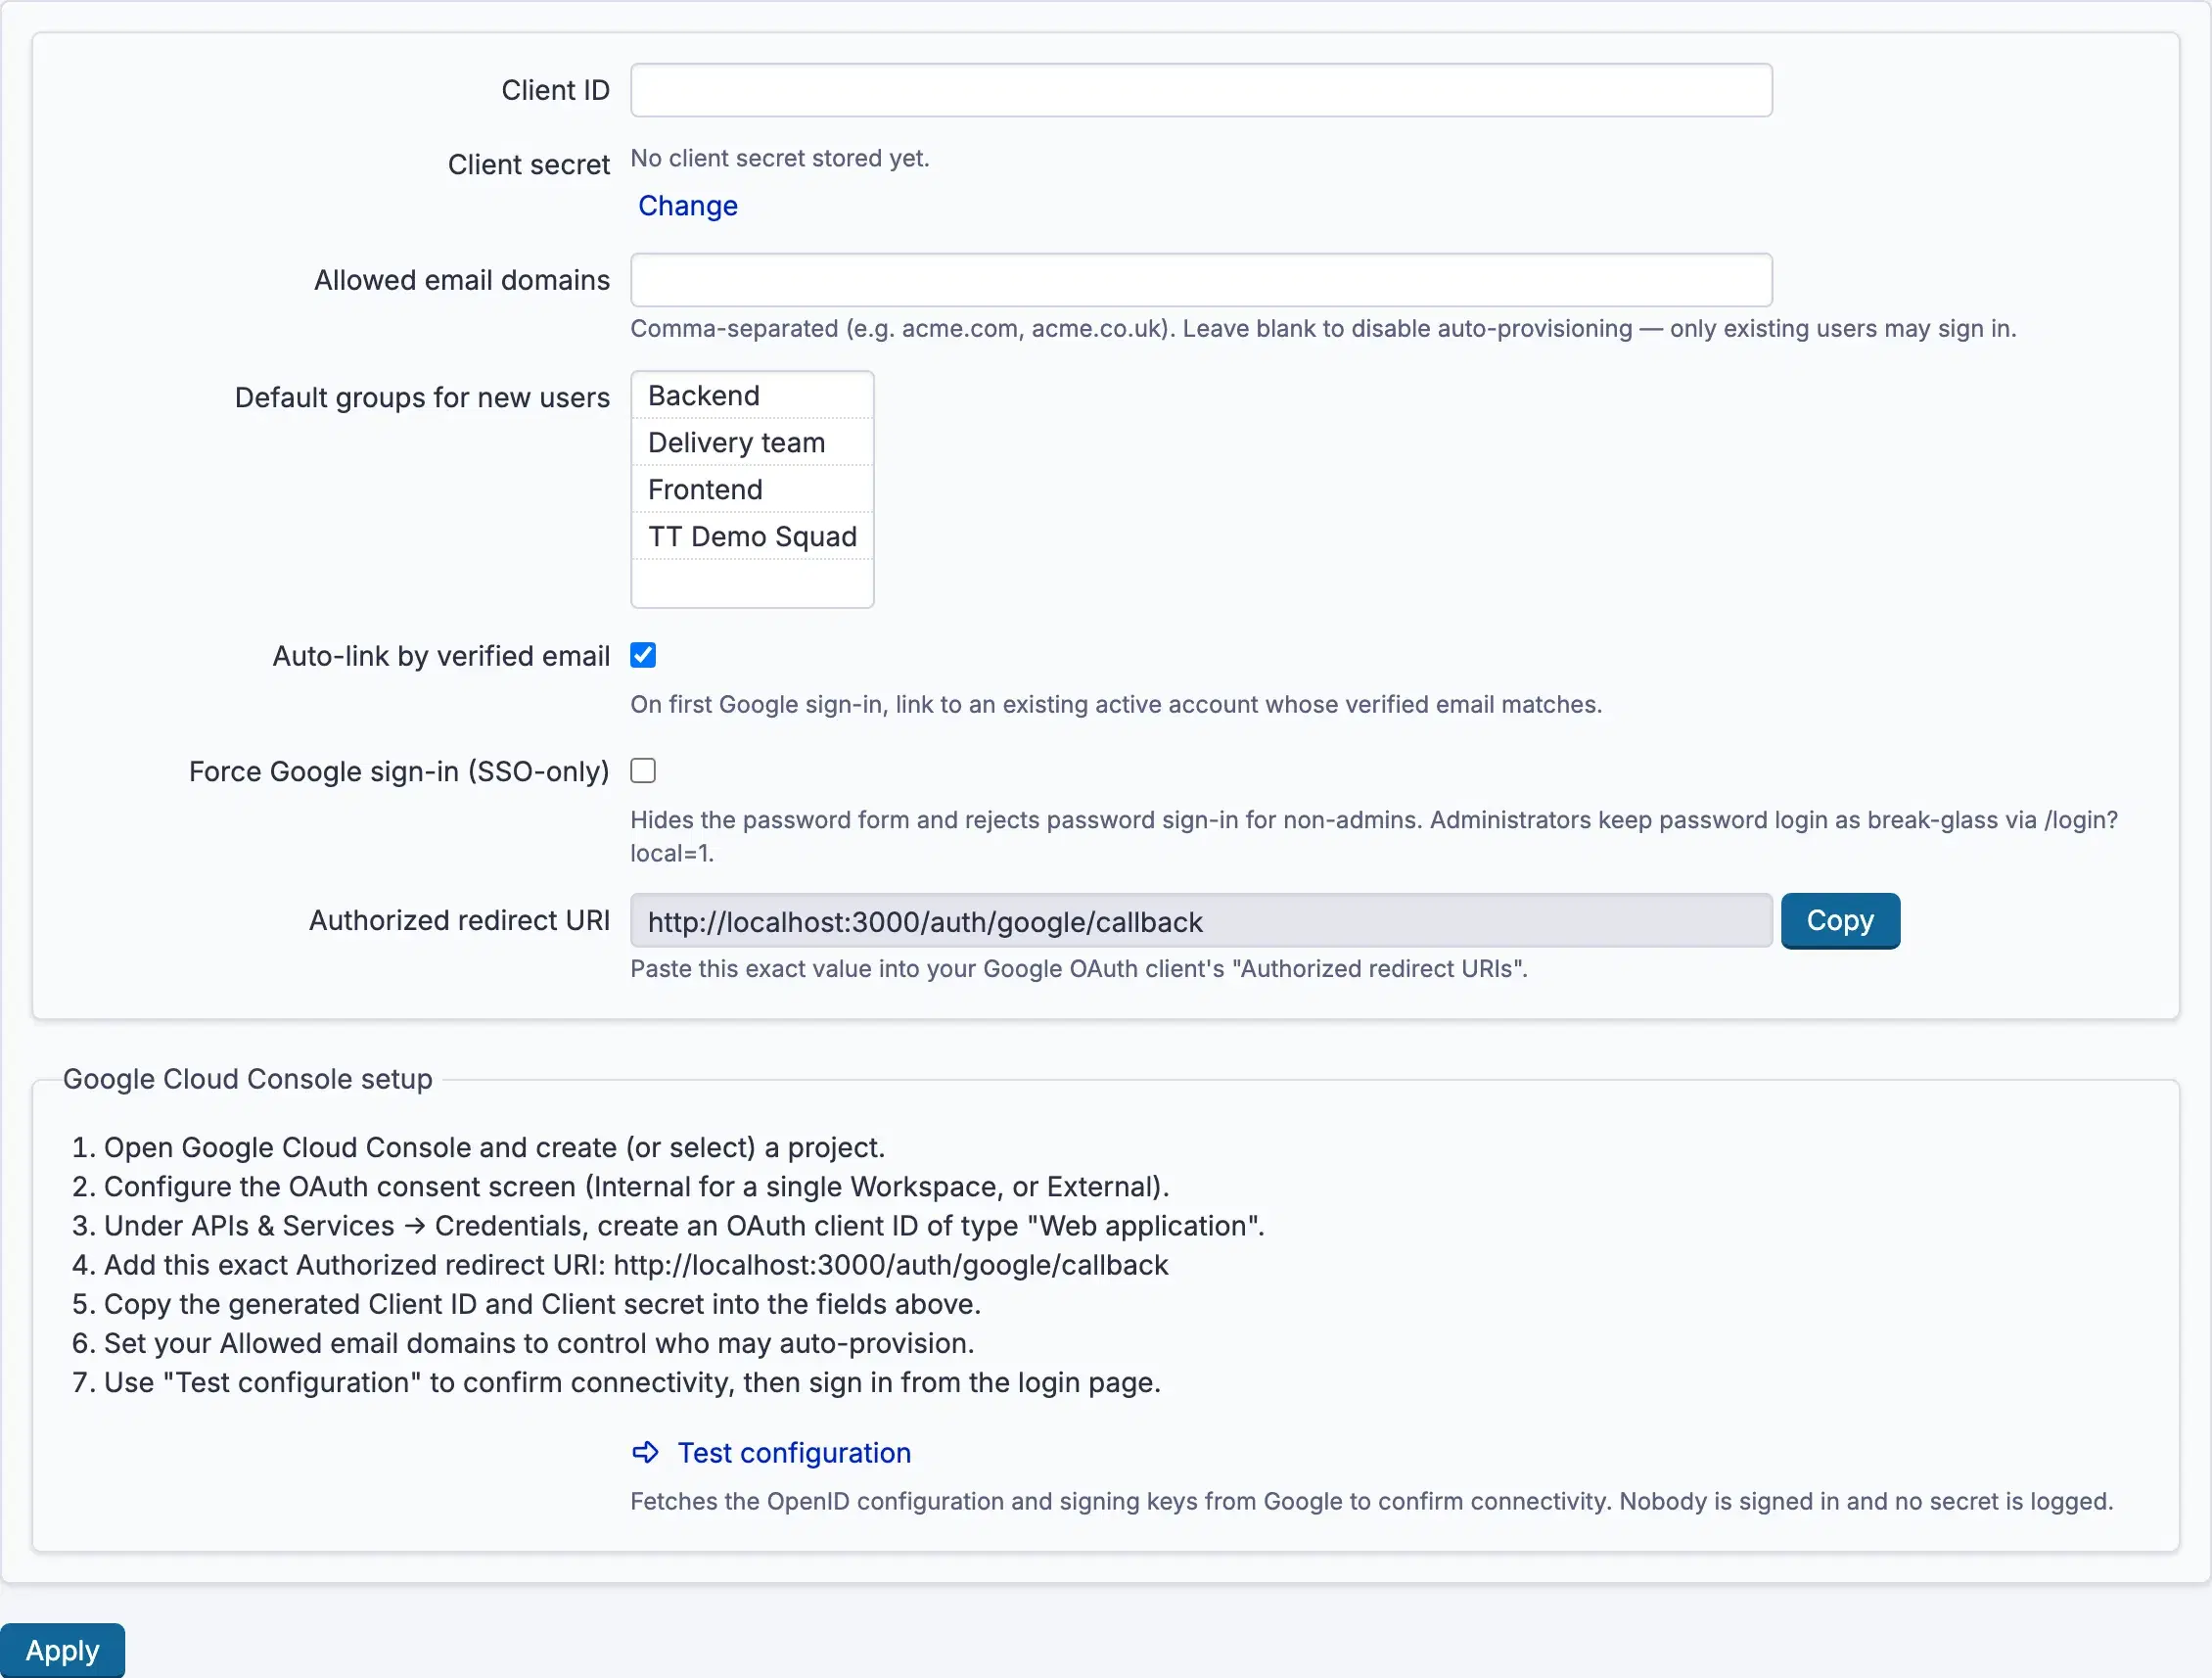
Test configuration checks connectivity by fetching Google's configuration and
signing keys. Nobody is signed in by it and no secret is written to a log.
Allowed email domains is the control that matters. Leaving it blank is the
safe default: sign-in works for people who already have an account, and nobody
new is created. Naming a domain means anyone at that domain who reaches your
sign-in page gets an account.
Before turning on Force Google sign-in (SSO-only), sign in with Google
yourself and confirm it works. Administrators keep a password route as a
break-glass path, but everyone else loses theirs the moment it is on.
Using it
- A person opens the sign-in page and chooses the Google button.
- Google asks them to approve, once.
- They arrive signed in. If
Auto-link by verified emailmatched an existing account, it is that account — not a second one. - Otherwise, if their domain is listed, an account is created and joins
Default groups for new users.
Troubleshooting
Google reports a redirect mismatch. The value in Google differs from
Authorized redirect URI on the settings page, which shows the exact string to
paste. A trailing slash or the wrong protocol is enough to break it.
Sign-in succeeds but no account exists. Allowed email domains does not
include their domain, and nothing is created automatically. Add the domain, or
create the account first.
Someone ended up with a second account. Auto-link by verified email was
off, or the existing account's email differs from their Google address, or that
account is locked — linking only attaches to an active one.
Nobody can sign in after enabling SSO-only. Administrators keep a password route as a break-glass path; use it and turn the setting off. This is why it should only be enabled after a successful Google sign-in.
No client secret stored yet. Only the identifier was saved. The secret is
stored encrypted and never displayed, so an empty field means absent rather than
hidden.
Connecting Google Cloud Console
You create one OAuth client in Google Cloud Console and paste two values into the workspace. The workspace shows you the exact redirect address to register, so nothing has to be typed twice. Nothing is asked of Google beyond identity: who signed in, and their verified email address.
On RedminePRO Cloud
The feature is preinstalled. Start at the next section.
On your own Redmine
Install the feature first — see the Google Sign-In configuration page — then follow the same steps. Your workspace must be reachable over HTTPS at a hostname Google can redirect back to.
Before you start
- An administrator account on the workspace.
- A Google Cloud project you can create credentials in, and the rights to edit its consent screen.
- Decide which email domains, if any, should get accounts created automatically.
On the external side
- In the workspace, open Administration →
Plugins→ RedminePRO Google Sign-In and copy theAuthorized redirect URIshown there. It is the exact string Google needs. - In Google Cloud Console, choose or create a project.
- Configure the consent screen for your organisation. Internal is the right choice when everyone signing in belongs to your own Google Workspace.
- Create credentials of the OAuth client type, for a web application.
- Paste the redirect address from step 1 into the client's authorized redirect addresses. It must match exactly — a trailing slash or the wrong protocol is enough to break it.
- Create the client. Google shows a client identifier and a client secret. Keep the secret somewhere safe; Google will not show it again.
No scopes beyond basic identity are required. The workspace asks who the person is and whether their email is verified, and nothing else.
In RedminePRO
- Administration →
Plugins→ RedminePRO Google Sign-In. - Paste the
Client IDand theClient secret, then save. The secret is stored encrypted and never displayed again — an empty field afterwards means stored, not missing. - Press
Test configuration. It fetches Google's configuration and signing keys to prove the workspace can reach them. Nobody is signed in by it and no secret is logged. - Set
Allowed email domainsif you want accounts created automatically. Leaving it blank is the safe default: sign-in works for people who already have an account and nobody new is created. - Optionally pick
Default groups for new users. - Leave
Force Google sign-in (SSO-only)off until you have signed in with Google yourself at least once.
Verify it works
Sign out, open the sign-in page, and use the Google button with your own
account. You should arrive signed in as your existing account rather than a new
one — that is Auto-link by verified email doing its job.
Then, before turning on SSO-only, have one other person try it. SSO-only removes the password form for everyone except administrators, and the time to discover a misconfiguration is before that, not after.
What is stored
The Client ID and the Client secret, the second encrypted at rest and never
written to a log. Against each account, the Google identity it is linked to.
Nothing else. No Google password ever reaches the workspace, no token is kept after sign-in, and no Google data beyond the person's identity and verified email is requested or stored.
Troubleshooting
| What you see | Why | What to do |
|---|---|---|
| Google reports a redirect mismatch | The registered address differs from the workspace's | Copy Authorized redirect URI again and paste it exactly |
| Sign-in succeeds, no account exists | Their domain is not in Allowed email domains |
Add the domain, or create the account first |
| A second account appeared | Auto-link by verified email is off, the emails differ, or the existing account is locked |
Turn linking on; linking only ever attaches to an active account |
No client secret stored yet. |
Only the identifier was saved | Paste the secret and save again |
| Nobody can sign in after SSO-only | Expected for non-administrators if Google sign-in is broken | Use the administrator password route, then turn SSO-only off |